
| Home | Astronomy Home | My Clear Skies | My Photos | Cool Stuff I Made | Tips & Procedures | My Setup |
| StarPowerCube | Observing Chair | Balance System | Telrad Mount | Flat Field Lightbox | Telrad Pulser Circuit | The Phaser Cam Cooler | The Springy Thingy |
To fill in some spare time I had and to provide my telescope and its growing compliment of power-hungry accessories with extended clean and reliable power, I recognized that I needed one or more heavy-duty portable power sources. After scouring the Internet for suitable units, I decided to build an all-inclusive mobile power station. My first attempt was a very decent and workable box but it did not come close to meeting all my needs.
These needs were to provide for the following devices:
|
Type of Device |
Wattage/Amps |
|
110Volt AC |
|
| Dell Latitude CPx 650Mhz Laptop | 70 Watts |
| USBay USB Hub (3 USB,1P,S1) | 55 Watts |
| AC-to-DC Regulated Power Supply | 100 Watts |
|
13.8 Volt DC |
|
|
LX200GPS 10" |
2.5Amps |
|
12 Volt DC |
|
| Portawattz 600 Watt Inverter | 0.3Amps (No-Load Draw) |
| DewBuster Controller | 0.5 Amps/6 Watts (No-Load Draw ) |
| Kendrick 10" Heater | 2.0 Amps/24 Watts |
| Kendrick Telrad Heater | .88 Amps/10.6 Watts |
| Kendrick 1.25" | .19 Amps/2.3 Watts |
| AC to DC Regulated Power Supply | 0.5Amps (No-Load Draw) |
| DC to DC Regulated Power Supply | 0.5Amps (No-Load Draw) |
|
8.4 Volts DC |
|
| Nikon Coolpix 995 | 1.4Amps/12 Watts |
|
3 - 12 Volts DC |
|
| Home-built Peltier Camera Cooler | .8 - 6 Amps/80Watts |
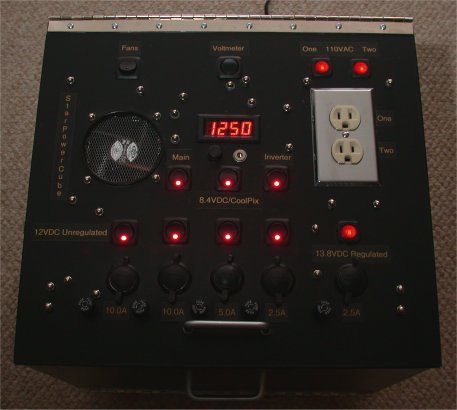
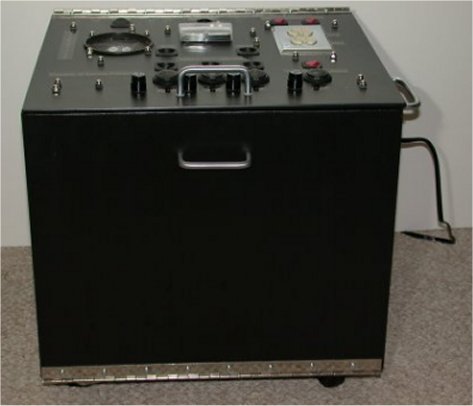
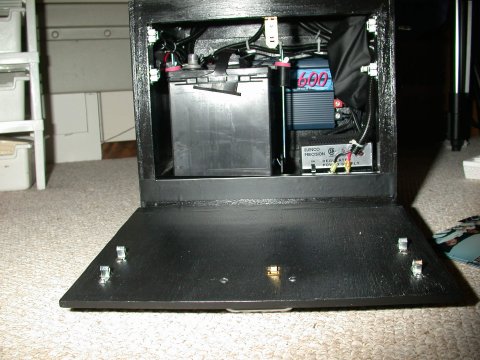
As you can see there is significant variation in the voltages and current required by the various accessories and devices. What made this task truly daunting was my sub-novice understanding of electronics. With the help of some really good people (Buck Harley, Todd Brower, and Dr. Clay) I was able to eke out a design that met the above needs and at the same time not blow myself and my equipment up. So after many many nights at the drafting table (the kitchen table) I came up with this design, The "StarPowerCube". Essentially a 15"x15"x12" cube on casters with pull handles.
The cube is constructed out of Grade A exterior plywood (sides - 3/8", bottom - 1/2") and the top made out of 1/4" Lexan plastic. I chose Lexan (its clear with a black contact paper layer) because I found the 3/8" ply had a tendency to split when drilled or screwed and panel-mounted components fit better on it. All the plywood is screw attached to 1"x2" interior Oak framing. The Top Panel and the drop-down front panel are attached via piano hinges and kept in place with cabinet latches. The cube's exterior and interior received two coats of prime, two coats of acrylic paint and a quick coat of polyurethane.
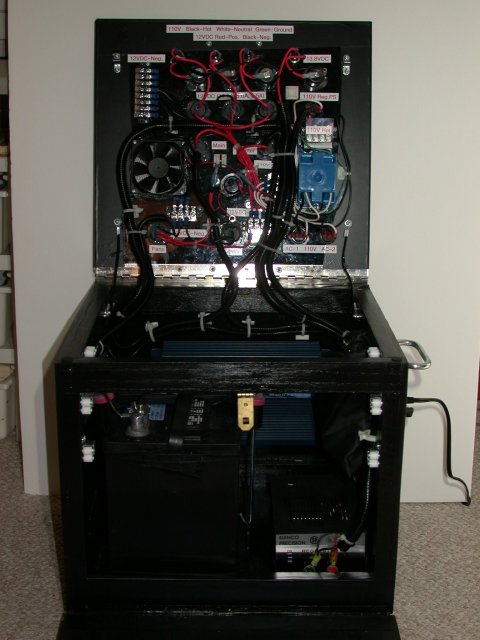
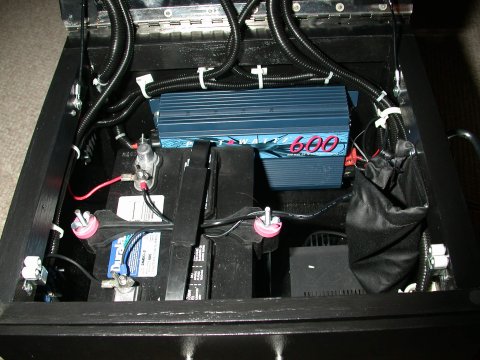
Almost all electrical components came from RadioShack with the exception of the 13.8 Regulated Power Supply. The power supply is an Elenco PS-3 unit purchased from Ocean Electronics out of Rhode Island for $21.95. I recently replaced the analog voltage meter with a digital LED meter. This required its own voltage regulator circuit (I can now design and build simple circuit boards and regulator circuits) to provide 5vdc power from the 12vdc battery. I also added a regulated 12V to 8.4V 1.5amp DC Power Supply to drive the CoolPix 995 for extended periods of time. The cube also has four (4) 12vdc outlet/jack to drive my 12vdc accessories.
All circuits have their own illuminated power switches. All 12vdc and 13.8 vdc circuits have their own in-line fuses with the fuse holders accessible from the top panel. I chose varying amperages for the fuses, ranging from 2.5a, 5a and 10a.
All wiring from the top panel to the main cube section is contained within 1/4" or 1/2" plastic wire loom to prevent abrasion of the insulation. The unit has two cooling fans, a 80mm exhaust fan on the top panel (hope it makes for a good hand-warmer in the dead of winter) and 60mm input fan on the side of the unit.
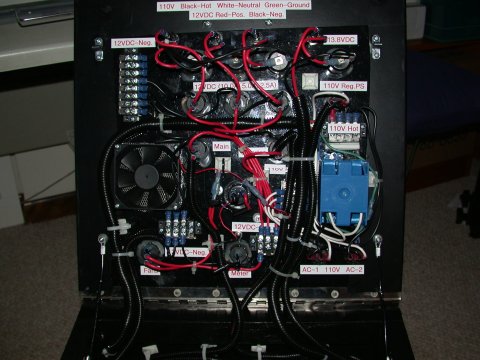
The unit is powered from an Auto-zone Duralast Deep-Cycle Marine Battery. It supplies 96Amp Hours of power and costs about $43.00. The battery is recharged in either one of two ways. If a truly deep battery discharge has taken place I will put the unit on a 10Amp Battery Charger and recharge it overnight. Most times I use a BatteryMinder Trickle/Conditioner Charge with an access port built into the side of the cube to trickle charge and recondition the battery. The black bag you see in picture below holds the BatteryMinder, its cables and some spare fuses.
The unit while mobile and portable is not lightweight. It tips the scales at 90lbs. It does fit nicely under my portable roll-up aluminum table. I plan on adding a collapsible luggage carrier type handle to more easily move the unit around.
The project cost more than I thought it would (approximately $350~$400) which was directly related to the fact I really didn't know what I was doing at first. It also took about 60 hours of construction (50% cube construction, sanding, priming and painting) and 50% wiring assembly and testing.
I am quite happy with the outcome. If you have any questions or would like to know more about my unit, please send me email at